

Guest Blogger: Steve Culton
You have to chuckle at the lengths some tyers will go to sell their flies.
Nowhere is this more apparent than in the mouse section of the fly bin. There they are, so cute and cuddly with their little black eyes, dainty ears and whiskers. Now, ask yourself a few questions. Do you really think a gator brown is going to check if that mouse-shaped thing floating over its lie has whiskers? Will it be able to see black eye dots on a grey fly at midnight on a new moon? Or, is the real purpose of that fly to attract and catch an angler?
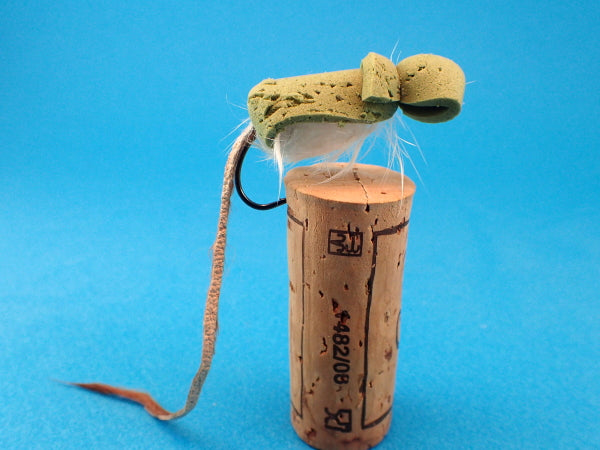
The Master Splinter mouse fly pattern makes no such pretensions. It is impressionism all the way. A tail, yes, but one that creates movement in the water. An underbody of rabbit fur that pulses and breathes with the slightest touch of current. And an overbody of foam that not only forms a lifelike silhouette, but also floats like a cork. That’s it. Simple. Easy to tie. And oh so effective.
The fly pattern was created by Joe Cermele, and as he describes it, the Master Splinter riffs off several other mouse fly patterns as well as saltwater standards like the Gartside Gurgler. I put the Master Splinter into my night fly rotation this summer, and it performed beyond my expectations. The trout loved it, even when they were too small to eat it. The big browns I was after attacked it with gusto. Unlike flies constructed of stacked deer hair (which eventually gets waterlogged) the Master Splinter mouse fly stayed high and dry for hours. Best of all, I had a wonderful souvenir of a good night’s fishing: the foam body became pitted and scarred from the teeth of aggressive hunters.
Fly Recipe
Hook: Gamakatsu B10S size 2
Thread: 6/0; color tyer’s choice
Tail: Rabbit strip 3.5” long, cut in half lengthwise; color tyer’s choice
Underbody: Crosscut rabbit strip, palmered; color tyer’s choice
Overbody: 2mm foam, 4”x ¾”; color tyer’s choice
Master Splinter Mouse Fly Tying Notes
To make the tail, strip the fur from the entire length of the hide except for the last half-inch (that’s the end of the tail) and tie in. Cut the foam and attach it to the hook shank; start ¼” away from the hook eye and tie it down to the hook bend. Bind the foam down until it forms a tubular shape around the shank. Next, tie in the crosscut rabbit strip and palmer to just behind the eye. Part the rabbit fur down the length of the hook shank, pushing the hair to both sides of the shank. Bring the foam forward over the fur, and bind it down just behind the eye with three hard wraps. Make the head by folding the foam back over itself, and bind it down with three more hard wraps. Add a drop of cement to the thread and whip finish. Trim the excess foam, leaving enough to form a small collar.